
You’ll find 30 easy-to-follow snowflake lantern ideas that take you from simple folded paper to show-stopping chandeliers. Start with basic vellum globes and move through Cricut-cut lace, glittered cardstock, and upcycled jar designs. Each project lists tools, clever shortcuts, and safe lighting tips so you can craft confidently. Pick a style, gather supplies, and try one—then you’ll be ready for the trickier techniques ahead.
Paper Folded Snowflake Lanterns for Beginners
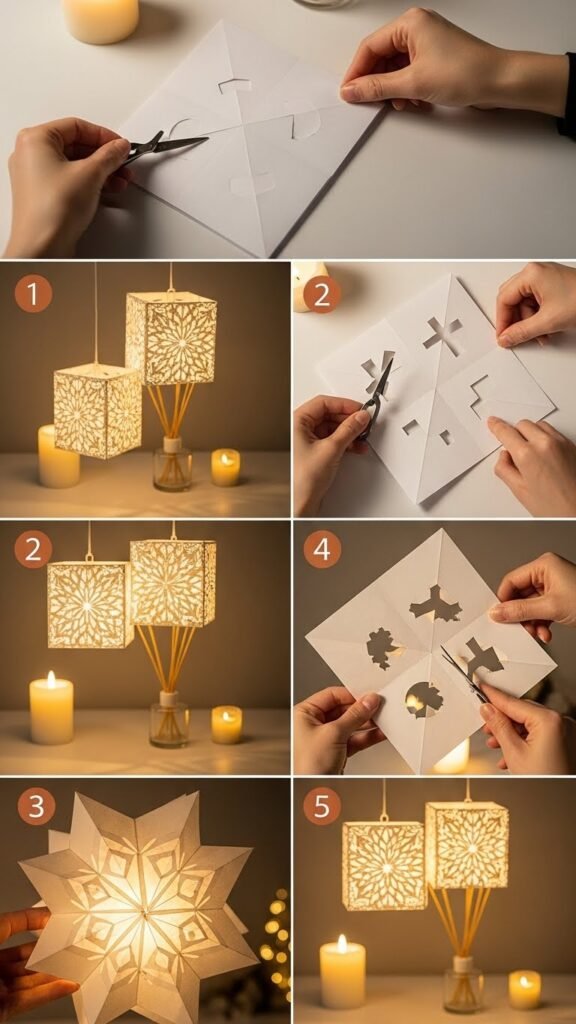
Starting with a square sheet of paper, you’ll fold crisp creases that turn a simple page into a delicate snowflake lantern — and you’ll see progress with every fold.
You follow clear origami templates, crease, cut small windows, and unfold to reveal airy patterns. Hang near candles or ambient diffusers for soft glow.
Each step frees your creativity; you’ll craft light, calm, and movement.
Glitter Cardstock Starburst Lantern
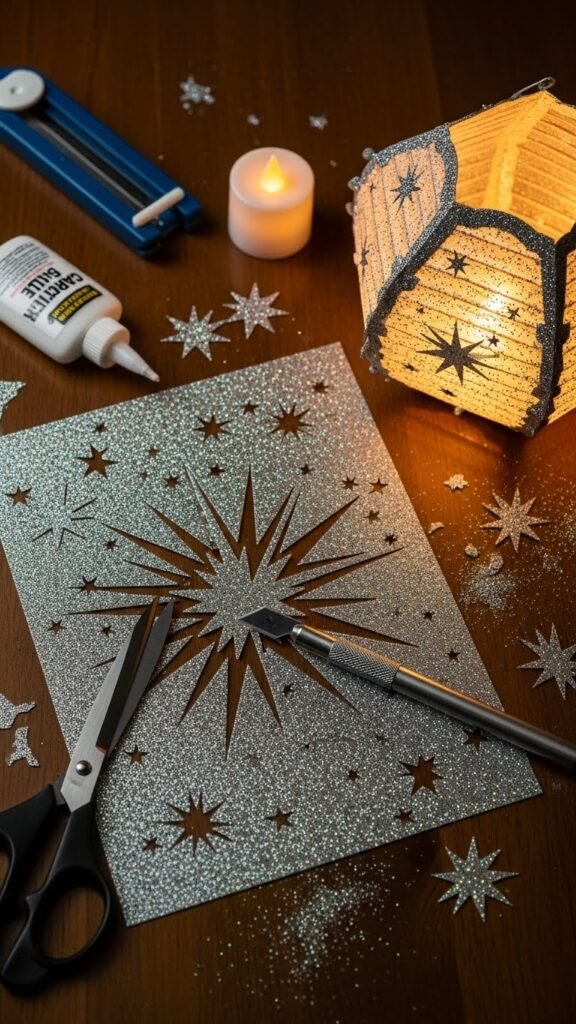
Grab a sheet of glitter cardstock and feel how its weight and sparkle change the lantern game — you’ll cut bold starburst arms, score clean folds, and assemble a sturdy shape that catches light from every angle.
You’ll trim glittered edges, practice precise cardstock layering, glue tabs, and punch a hanging hole. Finish by placing a battery tea light to watch rays burst.
Layered Vellum Diffused Snowflake Globe
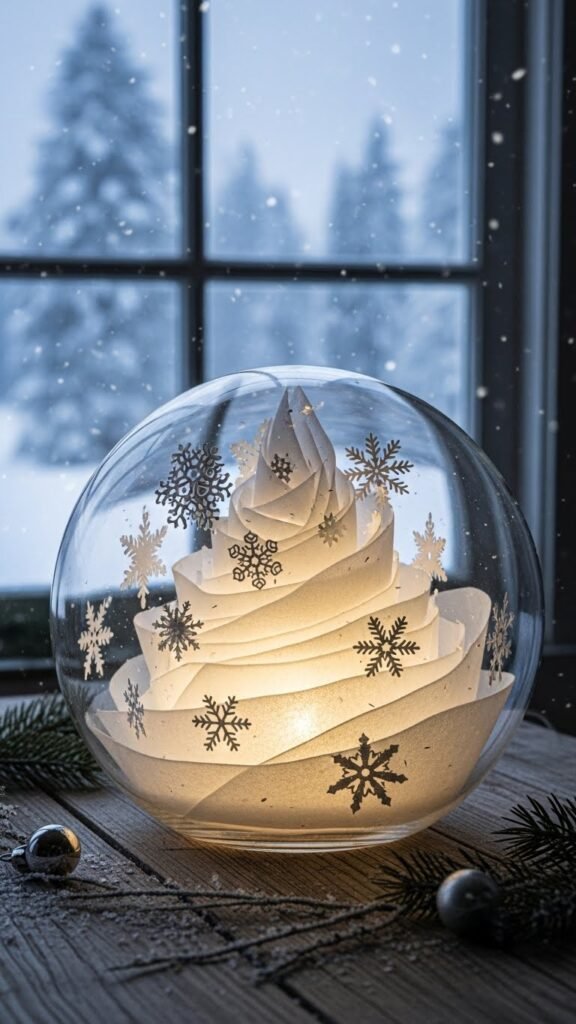
When you layer soft vellum sheets over delicate paper snowflakes, the light blurs into a gentle, frosted glow that turns a simple globe into a cozy winter scene; you’ll trace, cut, and stack each vellum layer to control how much light peeks through, then glue or tape them inside a clear globe so the flakes sit suspended at different depths.
Next, arrange, trim, and tweak for balanced globe diffusion.
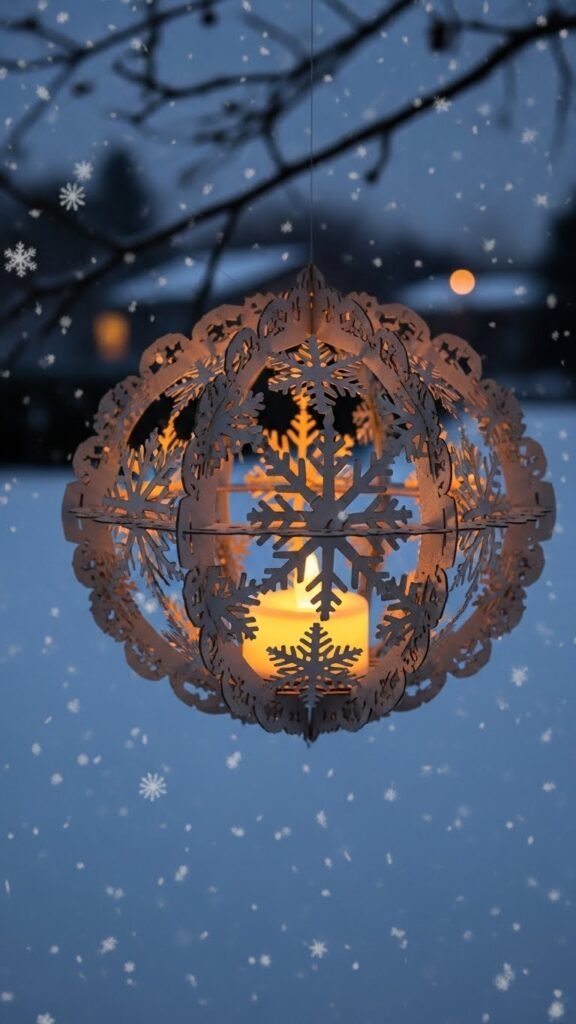
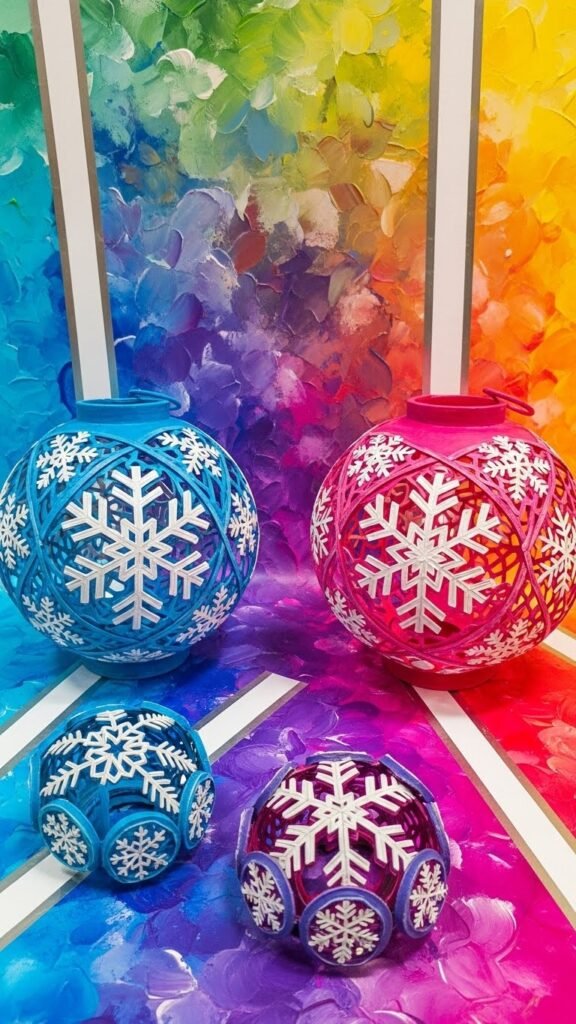
Cricut-Cut Intricate Snowflake Orb
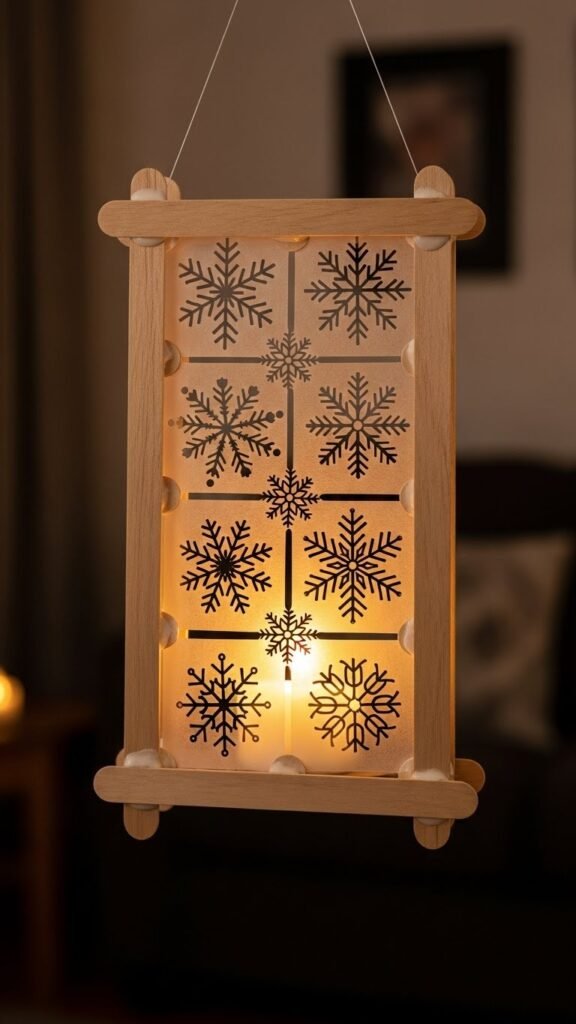
Popsicle Stick Frame With Wax Paper Snowflake Panels
Gusseted Paper Bag Snowflake Luminaria
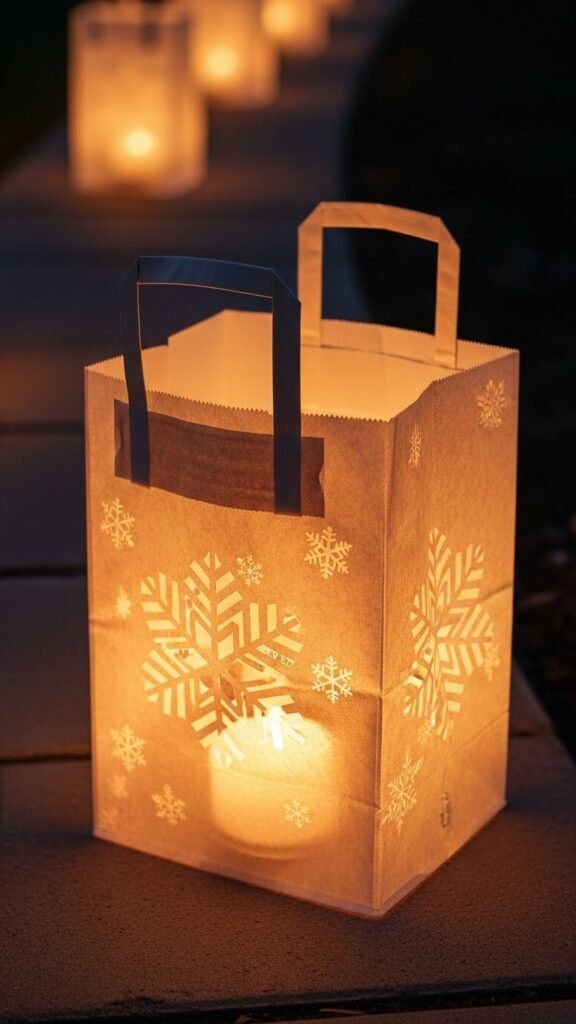
Although a simple paper grocery bag mightn’t look like much, you’ll transform its gusseted sides into a glowing snowflake lantern that’s sturdy, foldable, and perfect for lining a walkway.
Open the bag, score folded gussets, sketch a snowflake, cut carefully, then insert a battery tea light.
Crease edges for stability, add a handled luminaria loop, and place freely outdoors.
Recycled Container Snowflake Lanterns
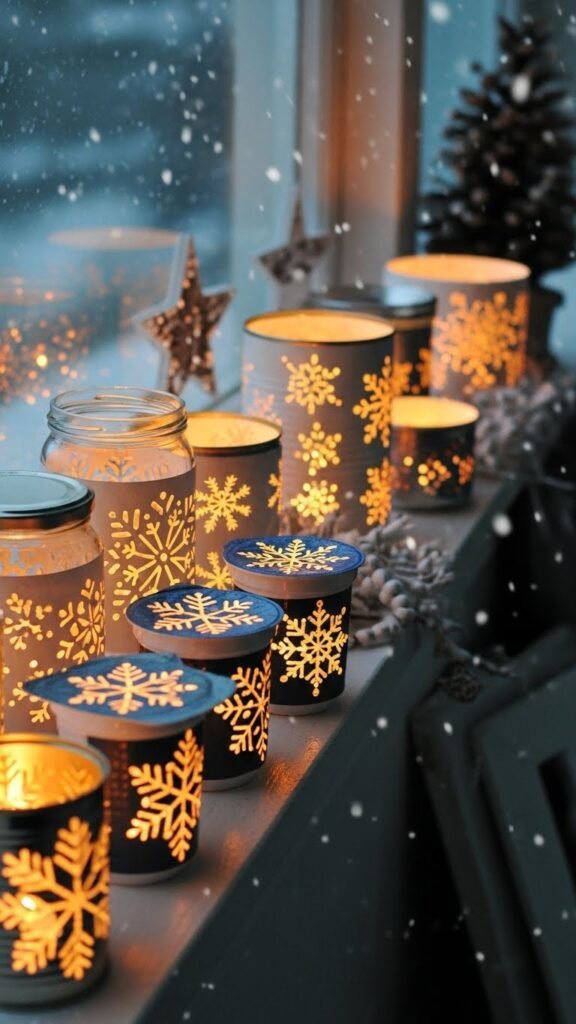
Gather up jars, tin cans, yogurt cups, and any other sturdy recyclables—you’re about to turn everyday throwaways into glowing snowflake lanterns. Clean and paint upcycled jars or cut plastic bottles into cuff shapes.
Sketch snowflake patterns, punch or carve openings, then add tea lights or LEDs. Arrange them along a porch or windowsill for liberated, cozy winter light.
Kraft Board Geometric Snowflake Box
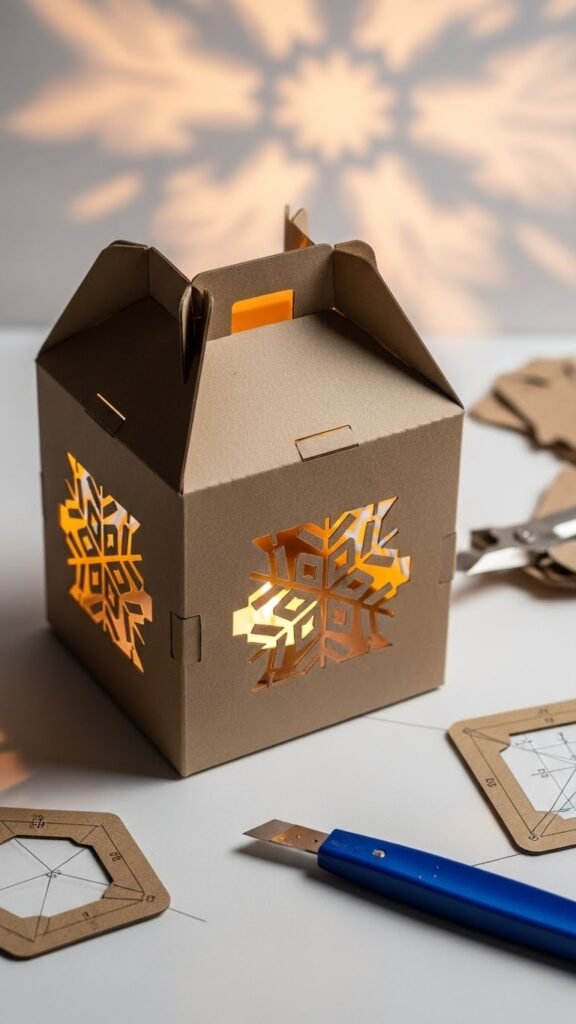
For this Kraft Board Geometric Snowflake Box, you’ll cut and score sturdy kraft board into crisp panels, fold precise tabs, and slot everything together to form a clean, faceted box that glows with a snowflake window.
You’ll trace kraftboard geometry guides, punch a tessellated snowflake pattern, assemble edges, and add a tea light or LED.
Enjoy open, airy angles and liberated winter light.
Paint-Splattered Winter Glow Lanterns
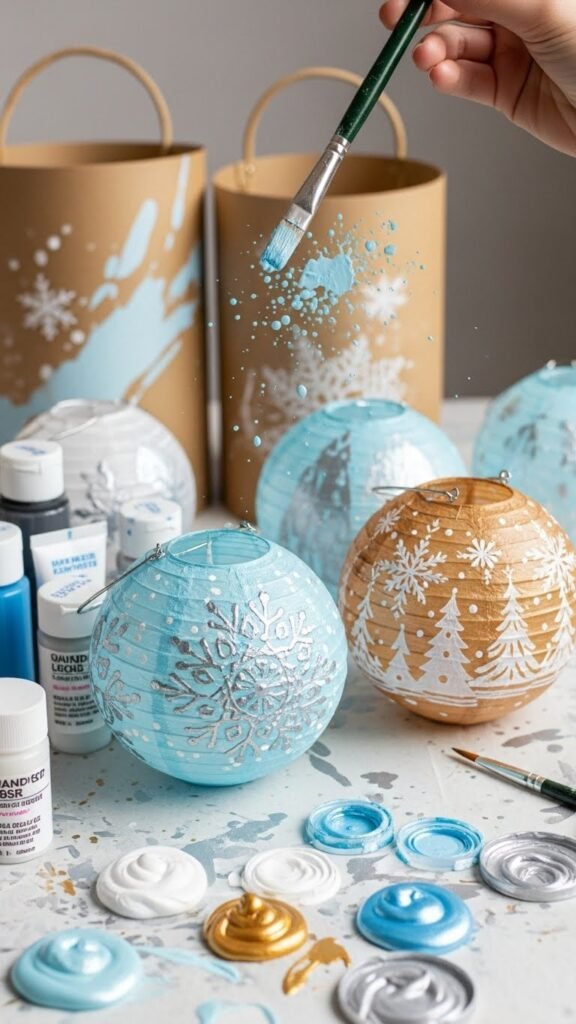
Kick things off by laying out your kraft board lanterns and a palette of acrylic paints so you can splatter, dab, and layer colors that catch the light—think icy blues, pearly whites, and a touch of metallic silver or gold. Next, flick paint with a brush for a bold splatter technique, let layers dry, then add crisp winter motifs with a fine brush to finish.
Stenciled Snowflake Jar Lanterns With Fairy Lights
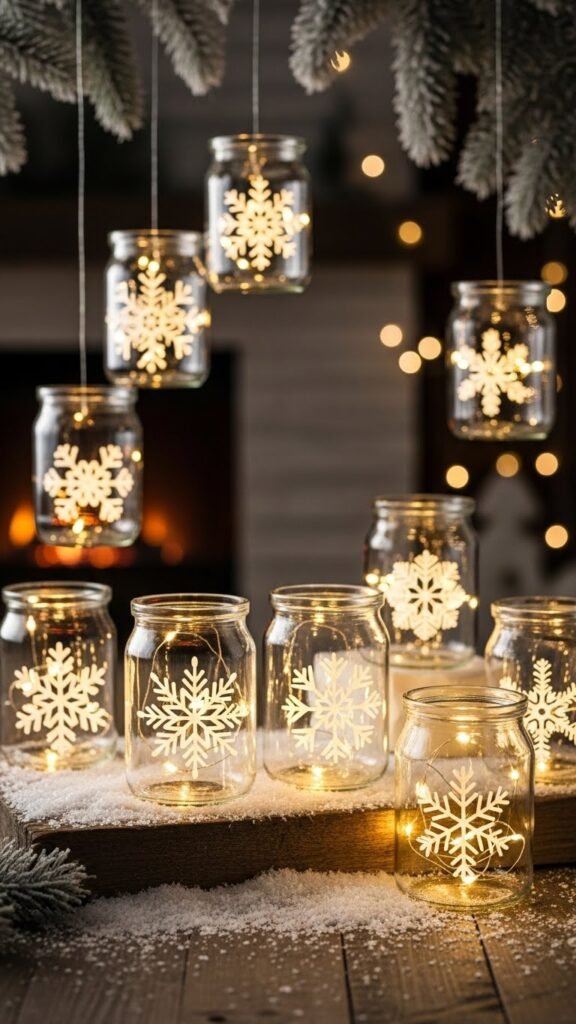
If you loved the bold energy of paint-splattered lanterns, try bringing that same wintry sparkle to clear jars using stencils and fairy lights. Choose Frost stencils, secure them, and paint thin white coats to create crisp glow patterns.
Peel gently, drop in a string of warm LEDs, and twist lids. Hang or cluster jars—watch patterns dance, freeing your space with simple, luminous joy.
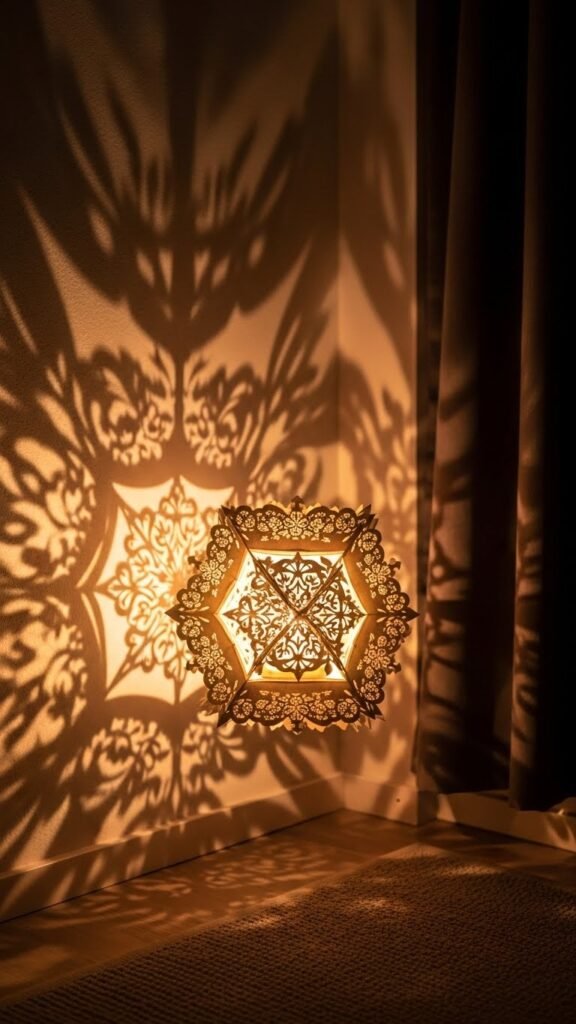
Multi-Layered Cutwork Snowflake Sphere
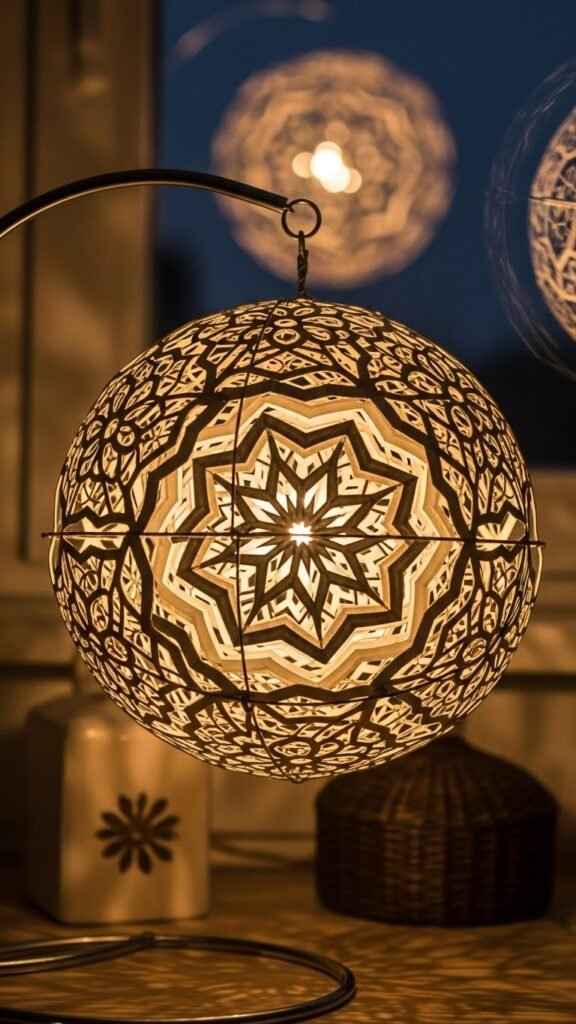
Once you’ve mastered hanging expandable flakes with toggles, try building a multi-layered cutwork snowflake sphere to add depth and presence to your display.
You’ll cut concentric papercut nesting patterns, assemble them on wire frames, and stagger distances to create a layered silhouette.
Light from within casts intricate shadows.
Follow measured templates, secure layers with clips, and suspend where breezes can spin it.
Fold-and-Slot Origami Snowflake Lamps
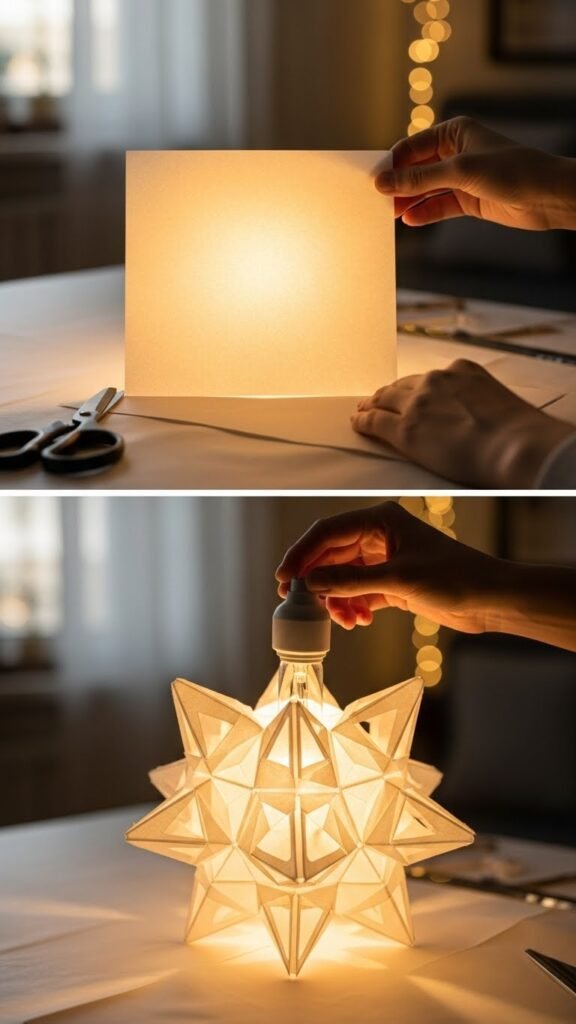
Fold crisp squares, slot them together, and watch a flat sheet transform into a glowing snowflake lamp you can hang or set on a table.
Start by folding precise creases, tuck folded tabs into matching slits, and check slot alignment as you assemble each arm.
Open the structure gently, adjust symmetry, then add a lightweight bulb or LED, and enjoy effortless, airy light.
Battery-Operated Tealight Snowflake Houses
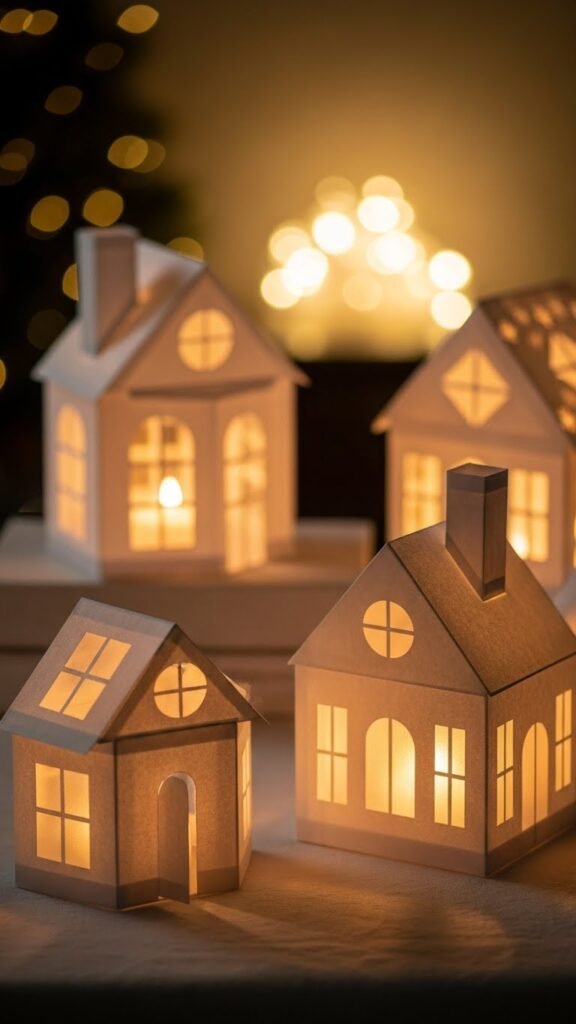
If you loved slotting together those origami snowflake lamps, you’ll enjoy building cozy battery-operated tealight snowflake houses that bring the same crisp geometry down to tabletop scale.
Start by folding six panels, slot and glue into a hex; cut frosted windows; nest a battery tealight inside.
Paint lightly, add a chimney, then place freely to glow and roam your room.
Glitter-Fused Snowflake Lantern Garland
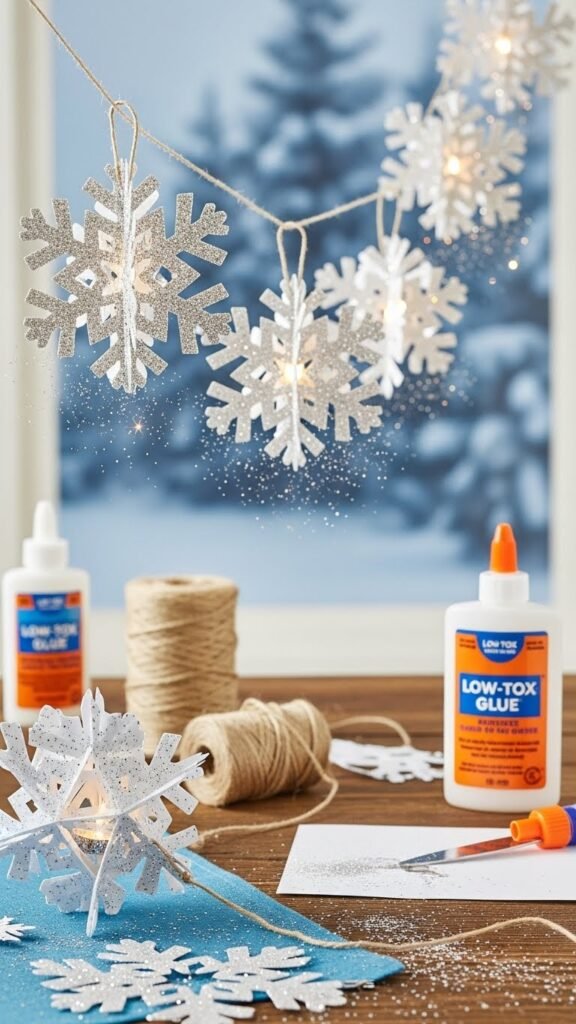
Think of a glitter-fused snowflake lantern garland as a string of tiny, twinkling ice-sculptures you can make in an afternoon: cut a series of paper snowflakes, brush the cut edges with glue, sprinkle on fine glitter, and let each piece dry before sealing it with a thin layer of translucent glue or clear tape.
Next, thread them on twine; manage glitter maintenance and avoid adhesive toxicity by choosing low-tox products.
Large-Scale Ceiling Snowflake Chandeliers
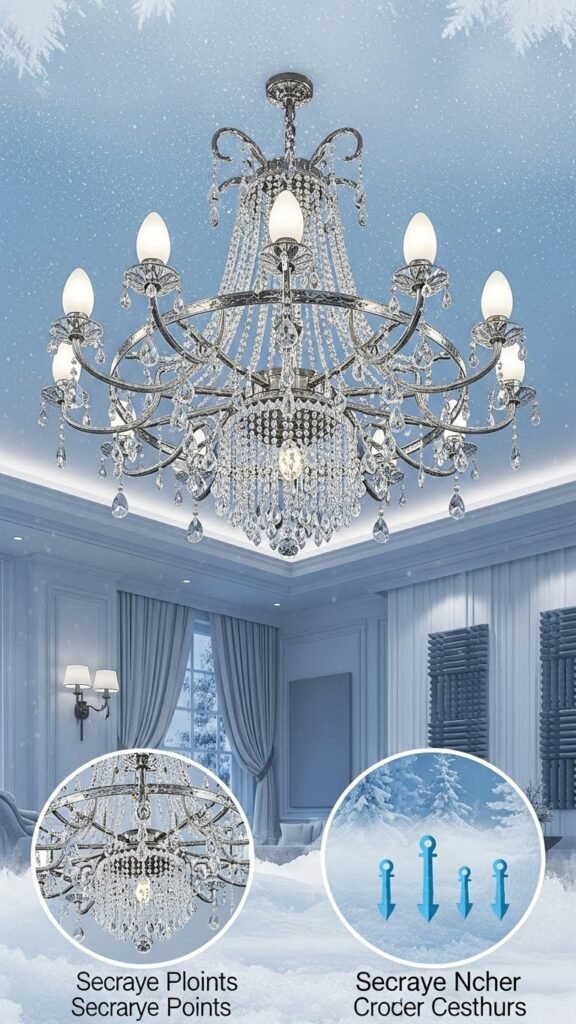
When you want a bold winter statement, large-scale ceiling snowflake chandeliers turn a room into a frosted sky—start by picturing the size, weight, and mounting points so each chandelier hangs safely and symmetrically.
First map a layout, mark secure anchors, and plan wiring. Layer frames, drape suspended crystals, add diffused bulbs, and consider acoustic dampening panels to keep sound mellow and freeing.
Tiny Ornaments: Mini Snowflake Tea Light Holders
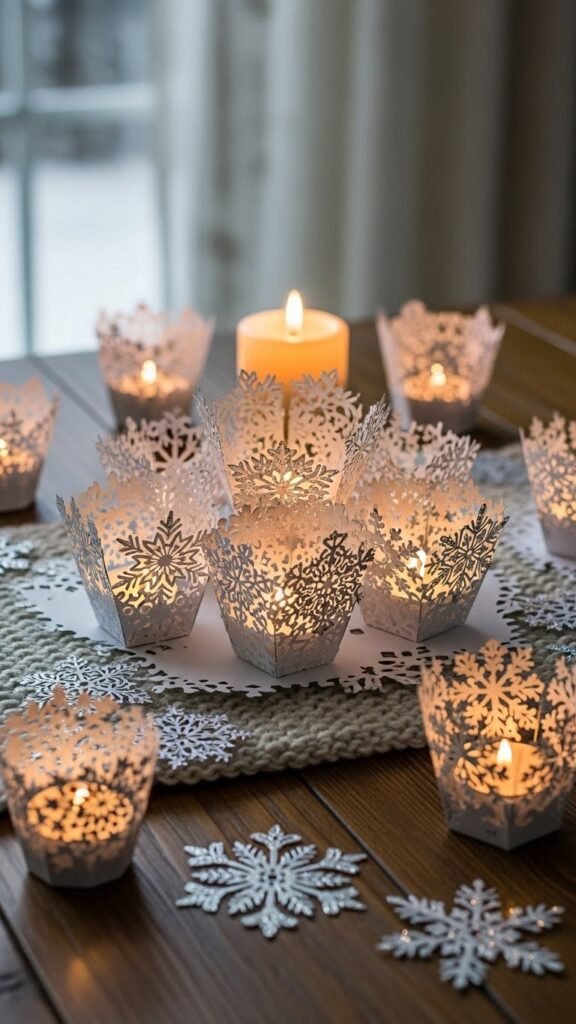
Gather a handful of simple supplies and you’ll make tiny snowflake tea light holders that softens any table with warm, frosted charm. Cut lightweight cardstock into snowflake rings, glue into mini chalice shapes, and cup tea votives safely inside. Paint translucent white, dust edges with shimmer, and let dry. Arrange freely; cluster several for playful glow and portable winter mood.
Hand-Painted Snowflake Lantern Collection
Bring a set of hand-painted snowflake lanterns to life by choosing a consistent palette and sketching each snowflake design first — you’ll paint layers that glow from within and vary the opacity for depth. Then, prep acrylic backgrounds, block in gradients, add crisp white highlights, and finish edges with metallic embossing. Hang, light, and tweak contrast until every lantern sings your free, personal style.
Wax Paper Collage Snowflake Lampshades
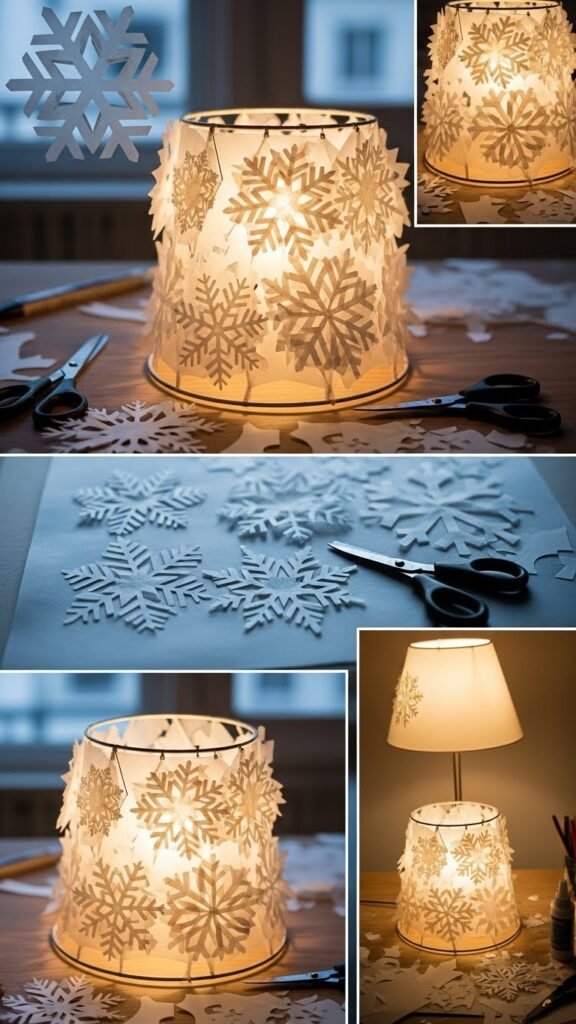
Cut translucent wax paper into overlapping snowflake shapes and arrange them on a simple lampshade frame so light can seep through layered edges; you’ll see how the collage builds depth as you work.
Tear, trim, and glue pieces in sections, enjoying translucent textures.
Let adhesive dry, then fit a shade over a lamp, observing wax candlecare—keep flame distance or use bulb-safe fixtures for freedom and safety.
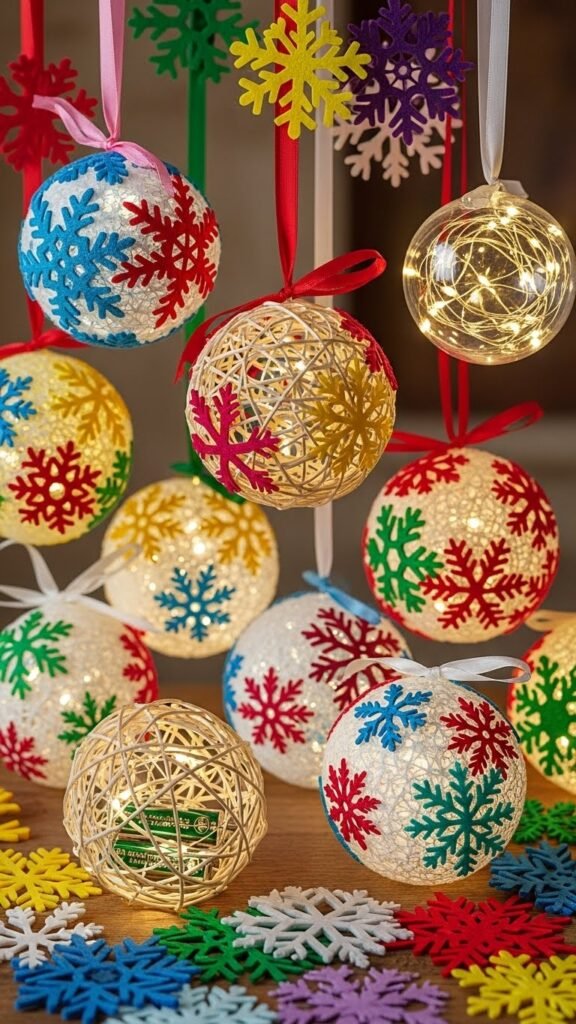
LED Twinkle Light Packed Snowflake Balls
Precision Cut Snowflake Lanterns Using X-Acto
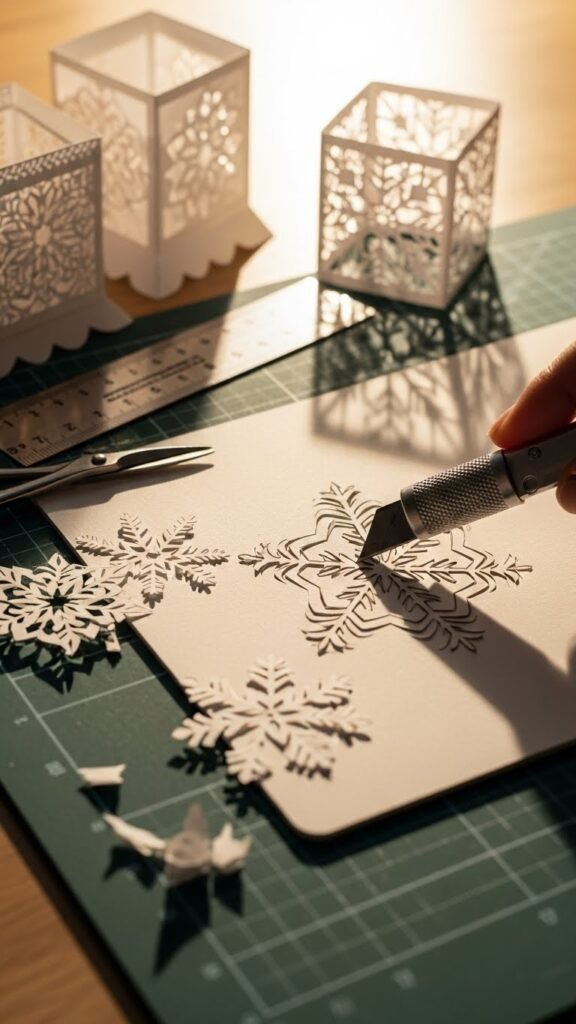
When you want crisp, delicate snowflakes that cast lace-like shadows, grab an X-Acto knife, a self-healing mat, and a steady hand—this method turns heavyweight paper or thin cardstock into lantern-ready panels with clean precision.
Trace precision stencils, cut slowly following bold lines, remove centers, and test fit panels. Keep light accessible, practice blade maintenance, swap dull tips, and enjoy liberated, precise results.
Burlap-Edged Rustic Snowflake Lanterns
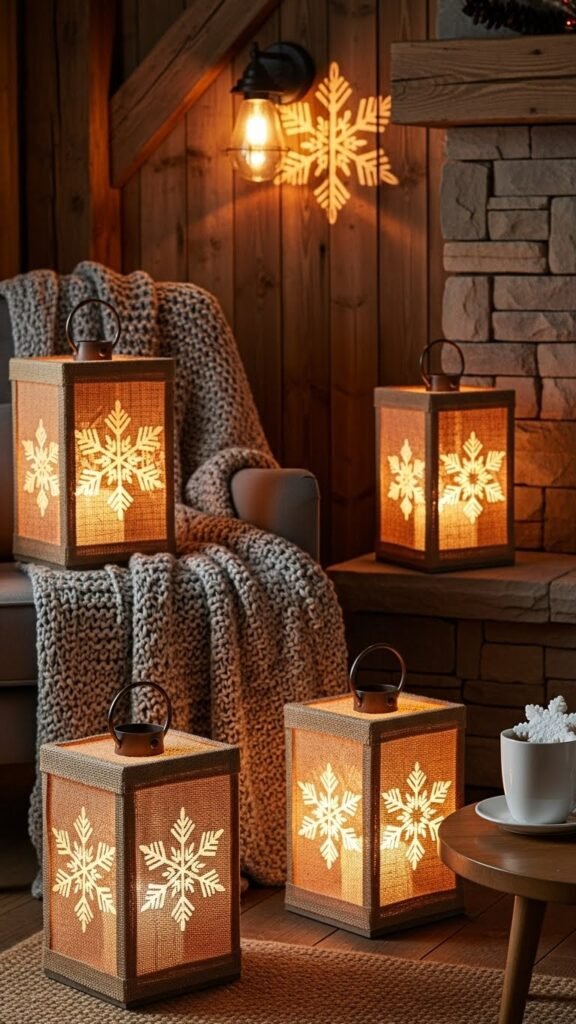
Give your snowflake lanterns a warm, rustic finish by adding burlap-edged panels that frame the cutouts and diffuse the light; you’ll love the cozy texture they add to any room. Start by cutting burlap to size, glue along rustic edges, trim stray fibers, then secure panels inside the lantern. Light a candle or LED and watch burlap textures glow, casting soft, free-spirited patterns.
Layered Tissue Paper Snowflake Luminaries
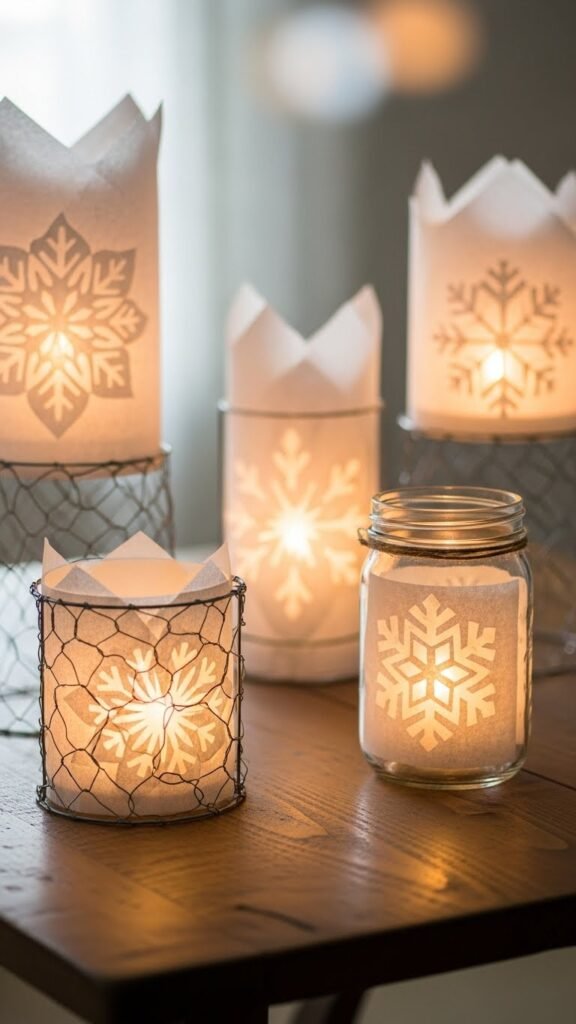
Layering delicate tissue paper over a simple lantern frame lets you build soft, glowing snowflake luminaries that feel both airy and intentional.
Start by cutting snowflake shapes, then apply tissue layering with diluted glue, smoothing each tier. Frame the pieces onto a wire or mason jar base. Light gently to test luminaire diffusing; adjust overlaps for dreamy, free-flowing glow.
Frosted Spray Adhesive Snowflake Sculptures
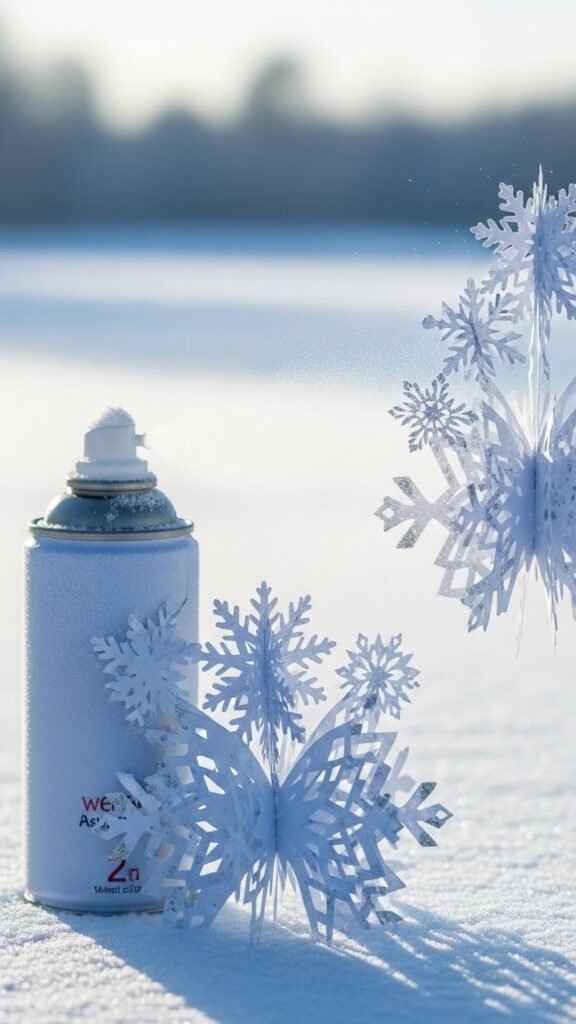
With a can of frosted spray adhesive and a few cut-paper snowflakes, you’ll turn flat shapes into sculptural, snowy ornaments in just a few quick steps.
Spray light layers, press and lift points to create depth, then mist edges for frosted techniques that catch light. Enjoy the tactile adhesive textures as you assemble airy clusters, hanging them where breezes make them gently spin.
Embellished Ribbon and Bead Snowflake Lights
Start by choosing a base snowflake—store-bought, hand-cut, or laser-cut—and plan how ribbon and beads will enhance its shape; you’ll weave ribbon through arms, tie small knots for loops, and string beads to catch the light.
Next, use ribbon embroidery to stitch texture, add beaded tassels at points, trim excess, and hang with thin wire so each piece moves freely and sparkles.
Sound-Responsive Twinkling Snowflake Orbs

Often you’ll be drawn to make your snowflake lanterns do more than shine — turn them into sound-responsive twinkling orbs that dance to music or voices.
First, mount Reactive LEDs inside a frosted globe. Next, add tiny Ambient Sensors to pick up beats and volume. Wire a simple microcontroller, set sensitivity, and hang freely. Watch lights pulse with every note.
Magnetic Panel Snowflake Lamps for Easy Assembly
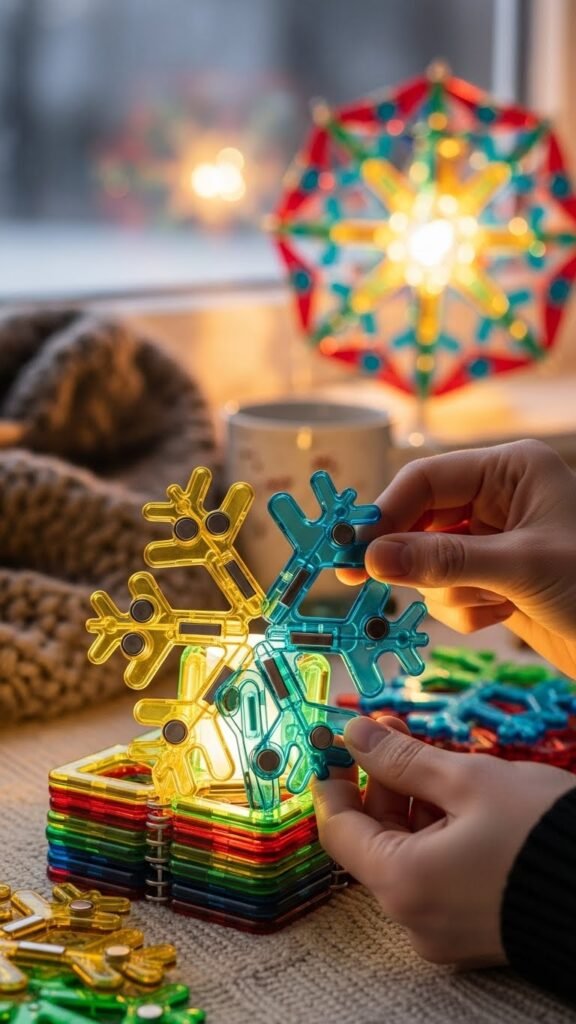
Built around simple snap-together pieces, magnetic panel snowflake lamps let you assemble a striking fixture in minutes — no tools required. You pick panels, feel the magnet clicks, and follow a clear snap fit assembly: edge to edge, layer by layer.
Align, press, and rotate until the snowflake blooms. Hang the lamp, add a battery light, and enjoy liberated, glowing winter nights.
Glued Paper Lace Snowflake Lanterns
Gently layer and glue delicate paper cutouts to create a lacy snowflake lantern that casts intricate shadows across your room.
First, fold and cut symmetrical shapes, then arrange pieces for airy, translucent patterns.
Apply thin glue along delicate edges, press gently, and let dry.
Mount the finished sleeve over a battery tea light.
Enjoy the drifting shadows as they free your space.
Color-Blocked Snowflake Nightlights
Try layering bold, contrasting paper panels to make a color-blocked snowflake nightlight that pops against a dark room.
Start by cutting geometric panels, then arrange ombre gradients from center outward.
Glue each layer so edges peek through.
Add neon accents for electric edges.
Mount a low-watt LED behind the snowflake, test placement, and hang or clip where soft, colorful glow frees your space.
Mixed-Material Snowflake Centerpiece Lanterns
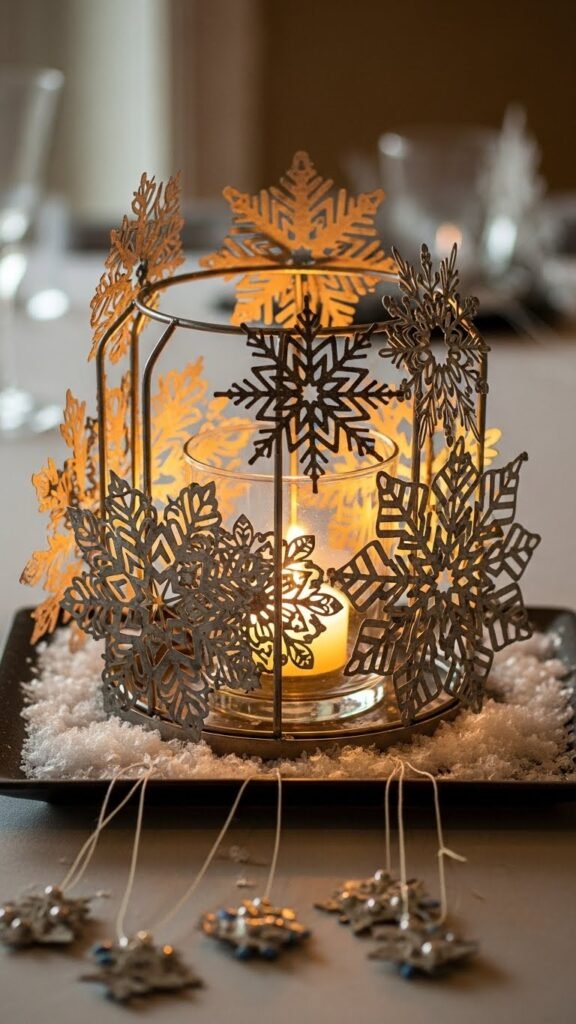
After you’ve played with color-blocked nightlights, bring those bold shapes into a mixed-material centerpiece that mixes paper, metal, and glass for depth and shine. You’ll layer a glass votive inside a metal cage, glue cut-paper snowflakes around it, and add tiny textured hangings for movement.
Arrange on a low tray, scatter faux snow, then light for a liberated, tactile focal piece.